Install-Module Error PackageManagement\Install-PackageProvider : No match was found for the specified search criteria for the provider ‘NuGet’. The package provider requires ‘PackageManagement’ and ‘Provider’ tags. Please check if the specified package
Install-Module Error PackageManagement\Install-PackageProvider : No match was found for the specified search criteria for the provider ‘NuGet’. The package provider requires ‘PackageManagement’ and ‘Provider’ tags. Please check if the specified package
This error is caused because your Windows session to powershell gallery is not using TLS 1.2
Windows images do not have latest Powershell Get module baked into it , If you have latest powershell get module then you are good to go .
Otherwise fix is
run below to enable TLS 1.2 on powershell session scope
Set-ExecutionPolicy Bypass -Scope Process -Force; [System.Net.ServicePointManager]::SecurityProtocol = [System.Net.ServicePointManager]::SecurityProtocol -bor 3072;
After this you can attempt to Install-module powershellget -RequiredVersion 2.2.4.1 and then you are all sorted.
Latest versions of powershellget will always negotiate on TLS 1.2
Azure Monitor Alert when VM is not available/Shutdown Down
Assuming you connected Virtual machine to Log Analytics already and sending heartbeats. Now You can run below powershell to get alerted when VM is not sending hearbeats . This scernario will cover you in boot reboot and shutdown events as well.
$LogAnalyticsResourceGroup= “Enter Log Analytics Resource Group”
$workspaceName=”Enter Log Analytics WorkspaceName”
$workspace = Get-AzOperationalInsightsWorkspace -ResourceGroupName $LogAnalyticsResourceGroup -Name $workspaceName
$dimension = New-AzMetricAlertRuleV2DimensionSelection -DimensionName “Computer” -ValuesToInclude “*”
$criteria = New-AzMetricAlertRuleV2Criteria -MetricName “Heartbeat” `
-DimensionSelection $dimension `
-TimeAggregation Total `
-Operator LessThan `
-threshold 3 `
Add-AzMetricAlertRuleV2 -Name “VM HeartBeat Alert” `
-ResourceGroupName $LogAnalyticsResourceGroup `
-WindowSize 00:05:00 `
-Frequency 00:01:00 `
-TargetResourceId $workspace.ResourceId `
-Condition $criteria `
-Severity 3
Convert pfx certificate to base64 string using Powershell
To get Certificate data from PFX File Run below Script in powershell.
$Certfile = "Enter your UNC Path"
[System.Convert]::ToBase64String([System.IO.File]::ReadAllBytes($Certfile))
To Export it to a text file
$Certfile = "Enter your UNC Path for Certificate in .PFX(Include Extension)"
$OutText = "Enter Output text file "
[System.Convert]::ToBase64String([System.IO.File]::ReadAllBytes($Certfile))  | out-File $OutText
Export data from All SQL tables within a Database in CSV format- Using Powershell
Hi
Here is the script you can use to export all the data from SQL tables within a given database into csv format. This script is purely powershell based.
Import-Module sqlps

$SQLServer = "localhost"
$DatabaseName = "DatabaseName"
$ExportLocation = "Path to Export"

$Tables = (Get-SqlDatabase -ServerInstance $SQLServer -Name  $DatabaseName).tables
foreach($table in $Tables)    {
        $SQLquery="select * from $($table)"
        $result=invoke-sqlcmd -query $SQLquery -serverinstance $SQLServer -database $DatabaseName
        Write-Host "Now Exporting Table $table"
        $result |export-csv "$ExportLocation$($table.Name).csv" -notypeinformation
}
List all ARM VMs in azure
Below script will list all ARM VMs in Azure
Add-AzureAccount

Class VirtualMachineInfo
{
    [string]$ResourceType
    [string]$Subscription
    [string]$ResourceId
    [string]$ResourceGroup
    [string]$Location
    [string]$Name
    [string]$ServiceName
    [string]$VNet
    [string]$Subnet
    [string]$Size
    [string]$Status
    [string]$VMtype
    [string]$GuestName
    [string]$PrivateIP
    [string]$publicIP
    [string]$diskname
    [string]$fqdn
    [string]$restype
    [string]$ostype
    [string]$monitoringagentextension
}

$allResources = @()
$filename = "c:\temp\azurereports\" + [string](get-azureaccount).ID.Split("@")[1] + "-CLASSIC.csv"

$vms =@()
$subscriptions = Get-AzureSubscription
foreach($subscription in $subscriptions){
$subscription

   Select-AzureSubscription   -Subscriptionid $subscription.SubscriptionId
   Write-Output "Processing data for subscription $Subscription.subscriptionname"
   $vms = Get-AzureVM

foreach ($vm in $vms){
         $VirtualMachineInfo = New-Object VirtualMachineInfo
         $VirtualMachineInfo.Subscription = $subscription.SubscriptionName
         $VirtualMachineInfo.Name = $vm.Deploymentname

         $VirtualMachineInfo.Status = $vm.InstanceStatus
         $VirtualMachineInfo.restype = [string] "Classic VM"

         #$VirtualMachineInfo.PrivateIP = $vm.IpAddress
         #$VirtualMachineInfo.publicip = $vm.PublicIPAddress
         $VirtualMachineInfo.ostype= $vm.vm.OSVirtualHardDisk.OS

         $VirtualMachineInfo.ServiceName = $vm.servicename

$uri=$vm.VM.OSVirtualHardDisk.MediaLink.AbsoluteUri
$VirtualMachineInfo.Location = Get-AzureDisk | Where-Object {$_.MediaLink -eq $uri}| Select-Object Location

$allResources += $VirtualMachineInfo | Select-Object `
            Subscription, `
            Name,   `
            Status, `
            Location , `
            Ostype , `
            Servicename
}

}
$allResources = $allResources | Sort-Object Subscription, ResourceType
$allResources | Export-Csv -Path $filename -Force
List all the Classsic Azure VMs
Below script will list all the Classic VMs in azure .
Add-AzureAccount

Class VirtualMachineInfo
{
    [string]$ResourceType
    [string]$Subscription
    [string]$ResourceId
    [string]$ResourceGroup
    [string]$Location
    [string]$Name
    [string]$ServiceName
    [string]$VNet
    [string]$Subnet
    [string]$Size
    [string]$Status
    [string]$VMtype
    [string]$GuestName
    [string]$PrivateIP
    [string]$publicIP
    [string]$diskname
    [string]$fqdn
    [string]$restype
    [string]$ostype
    [string]$monitoringagentextension
}

$allResources = @()
$filename = "c:\temp\azurereports\" + [string](get-azureaccount).ID.Split("@")[1] + "-CLASSIC.csv"

$vms =@()
$subscriptions = Get-AzureSubscription
#$subscriptions = "Beta"
foreach($subscription in $subscriptions)
{
$subscription

  #  Select-AzureSubscription -Current -PassThru -SubscriptionId  (Get-AzureSubscription -SubscriptionName $subscription).SubscriptionId
  # Set-AzureRmContext -SubscriptionName $subscription.SubscriptionName
   #$account = $subscription | foreach-object {$_.defaultaccount}
   Select-AzureSubscription   -Subscriptionid $subscription.SubscriptionId
   Write-Output "Processing data for subscription $Subscription.subscriptionname"
    $vms = Get-AzureVM

foreach ($vm in $vms)

{
         $VirtualMachineInfo = New-Object VirtualMachineInfo
         $VirtualMachineInfo.Subscription = $subscription.SubscriptionName
         $VirtualMachineInfo.Name = $vm.Deploymentname
        #$VirtualMachineInfo.ResourceType = ($RmResource).ResourceType
        #$VirtualMachineInfo.VNET = $vm.VirtualNetworkName
        #$VirtualMachineInfo.Subnet = Get-AzureSubnet -VM $vm
        #$VirtualMachineInfo.size= $vm.InstanceSize
         $VirtualMachineInfo.Status = $vm.InstanceStatus
         $VirtualMachineInfo.restype = [string] "Classic VM"

         #$VirtualMachineInfo.PrivateIP = $vm.IpAddress
         #$VirtualMachineInfo.publicip = $vm.PublicIPAddress
         $VirtualMachineInfo.ostype= $vm.vm.OSVirtualHardDisk.OS

         $VirtualMachineInfo.ServiceName = $vm.servicename

$uri=$vm.VM.OSVirtualHardDisk.MediaLink.AbsoluteUri
$VirtualMachineInfo.Location = Get-AzureDisk | Where-Object {$_.MediaLink -eq $uri}| Select-Object Location

$allResources += $VirtualMachineInfo | Select-Object `
            Subscription, `
            Name,   `
            Status, `
            Location , `
            Ostype , `
            Servicename
}

}
$allResources = $allResources | Sort-Object Subscription, ResourceType
$allResources | Export-Csv -Path $filename -Force
Some useful OMS Queries
Remove Header from Powershell get output
How to remove @ from array when working with JSON on Azure
When you work with JSON on powershell to chnage/replace arrays/list . you will see Convertto-Json will change your Azure compliant ARM template and put @ in front of arrays. This may cause issues in deployment.
Filter : {@{resource=; resourcegroup=}}
$TargetFile | ConvertTo-Json -Depth 50 | % { [System.Text.RegularExpressions.Regex]::Unescape($_) }
Output :
“resource”: {
“property”: “name”,
“condition”: “like”,
“resourcetype”: “*”
},
“resourcegroup”: {
“property”: “resourcegroupname”,
“condition”: “like”,
“subscription”: “sub-xyz”
}
Export /Import ADFS Claim Rules for your relying party trusts to a text file
Sometimes you might be bored creating similar/same claim rules accross your enviornments . Below method will quickly help you export your claim rules and apply to different relying party trust
Step1 : Export to a text file
(Get-AdfsRelyingPartyTrust -Name "Source Relying Part Trust Name").IssuanceTransformRules | Out-File "C:\path.txt"
Step 2 : Apply /Set your claim rules from text file you exported in last step
Set-AdfsRelyingPartyTrust -TargetName "Destination Relying Party Trust" -IssuanceTransformRulesFile "C:\path.txt"
Multi-Home OMS Agent using powershell
You can run below script on the VM iteself to talk to multiple workspaces. One Microsoft Monitoring Agent can talk to upto 4 workspaces. You can embed this into Remote PS-Session if you want to use PSRemoting.
#Enumerate workspace details.
$workspaces = @(
     #First Workspace
    ("WorkspaceID", "Key"), `
     #Second Workspace
    ("WorkspaceID", "Key"), `
     #Third Workspace
    ("WorkspaceID", "Key")
)
#Add workspaces
           foreach ($workspace in $workspaces) {

           Write-Host " Working on Workspace $workspaces[0]"
                             $mma = New-Object -ComObject 'AgentConfigManager.MgmtSvcCfg'
                             $mma.AddCloudWorkspace($workspace[0], $workspace[1])
                             $mma.ReloadConfiguration()
                }
ADFS second node not authenticating after certificate renewal
If you are getting below error
Event 15021 HttpEvent
An error occurred while using SSL configuration for endpoint sts.domain.com:443. The error status code is contained within the returned data.
Here is the fix.
- Import New Certificate on Personal store.
- Get Service Comms Certificate thumbprint and run below on node 2
Set-AdfsSslCertificate -thumprint "your thumbprint"
Enable Accelerated Networking
When Azure planned reboots occurred we have seen performance degradation on several VMs . Here is the quick fix which doesn’t cost anything extra.
We need to enable Accelerated networking to overcome this problem . process is pretty simple
Note : This solution only works on VM that is not a member of availability set.
Steps to enable accelerated networking
- Deallocate VM
- Note NIC Name and resource group name where nic reside
- Assign new NIC to VM
- Deallocated old nic .
- Run below on cloudshell
az network nic update --name NICNAME --accelerated-networking true --resource-group RESOURCEGROUP
- Assign old nic back to the VM
- Deallocated new NIC and start VM
How to use Classic Azure Express Route Powershell
get-module
####### #Import the required Azure Powershell program modules
Import-Module 'C:\Program Files (x86)\Microsoft SDKs\Azure\PowerShell\ServiceManagement\Azure\Azure.psd1'
Import-Module 'C:\Program Files (x86)\Microsoft SDKs\Azure\PowerShell\ServiceManagement\Azure\ExpressRoute\ExpressRoute.psd1'

#Get the publish settings file for the master Express Route Subscription
login-azurermaccount

Import-AzurePublishSettingsFile $PublishSettings
#Change to the Master Subscription

$Subscription = "subscfriptionname"
Select-AzureSubscription -SubscriptionName $Subscription
#Get the Service Key
Get-AzureDedicatedCircuitlink -ServiceKey   #***  # This should show all the existing links provisioned on the ExpressRoute Circuit


# Use the following command to list all the Authorisations currently associated with the ExpressRoute circuit
# If required use the Remove Authorization commend to tidy up any authorisations with unused links

Get-AzureDedicatedCircuitLinkAuthorization -ServiceKey *** # This should show all the existing authorisations
Cross Subscription or Tenant VNET to VNET VPN Gateway
Scenario
There are 2 tenants , Tenant A and B.
They both have existing infrastructure in their subscriptions. Due to organisational merge they want to connect VNETs together on Azure Fabric keep both sides secure.
On both the sides they have Express route and doesnt have enough bandwidth on gateway subnet to house a gateway.
How do we do this ? 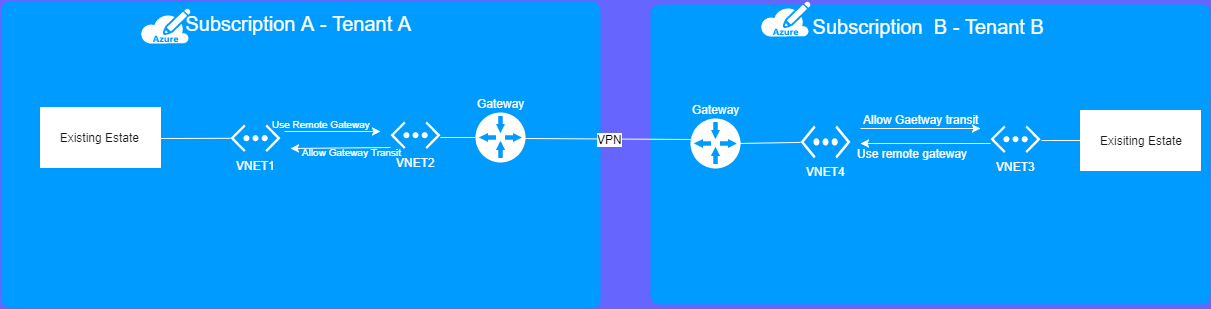
they will need to use VNET to VNET VPN gateway is the solution.
In subscription A
VNET 1 VNET2
In subscription B
VNET 3 VNET 4
VNET 1 to VNET 2 are connected via VNET- VNET Peering you choose the option “Use remote gateways”. For vnet 2 you select “Allow gateway transit”.
VNET 3 to VNET 4 are connected via VNET- VNET Peering Do the same for subscription B, except, vnet D will use remote gateway, and C will allow it.
VNET 2 VNET 4 are connected via cross subscription VPN Site-to-Site Gateway
Use VPN Gateway between 3 and 4 .